Kernel Development on ARM
Lab objectives
- get a feeling of what a System on a Chip (SoC) means
- get familiar with the embedded world using ARM as a support architecture
- understand what a Board Support Package (BSP) means
- compile and boot an ARM kernel with QEMU using NXP i.MX6UL platform as an example
- get familiar with hardware description using Device Trees
System on a Chip
A System on a Chip (SoC) is an integrated circuit (IC) that integrates an entire system onto it. The components that can be usually found on an SoC include central processing units (CPU), memory, input/output ports, storage devices together with more sophisticated modules like audio digital interfaces, neural processing units (NPU) or graphical processing units (GPU).
SoCs can be used in various applications; most common are:
- consumer electronics (TV sets, mobile phones, video game consoles)
- industrial computers (medical imaging, etc)
- automotive
- home appliances
The leading architecture for SoCs is ARM. Worth mentioning here is that there are also x86-based SoCs platforms. Another thing we need to keep an eye on is **RISC-V** an open standard instruction set architecture.
A simplified view of an ARM platform is shown in the image below:
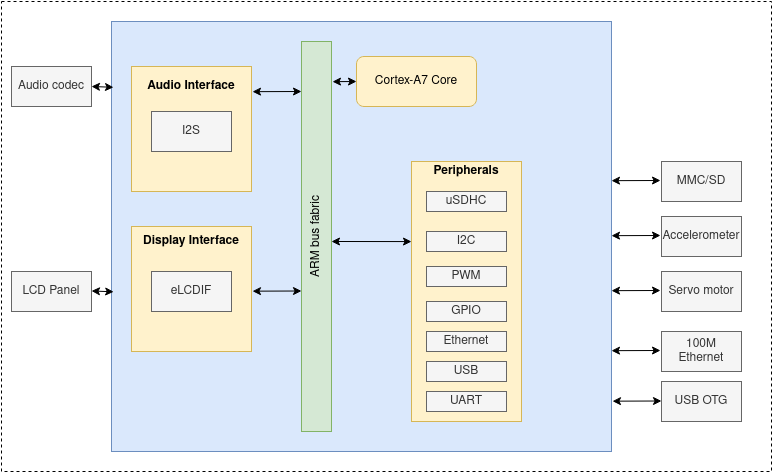
We use NXP i.MX6UL as a reference platform, but, in general, all SoCs contain the following building blocks:
- one or more CPU cores
- a system bus
- clock and reset module
- PLL
- OSC
- reset controller
- interrupt controller
- timers
- memory controller
- peripheral controllers
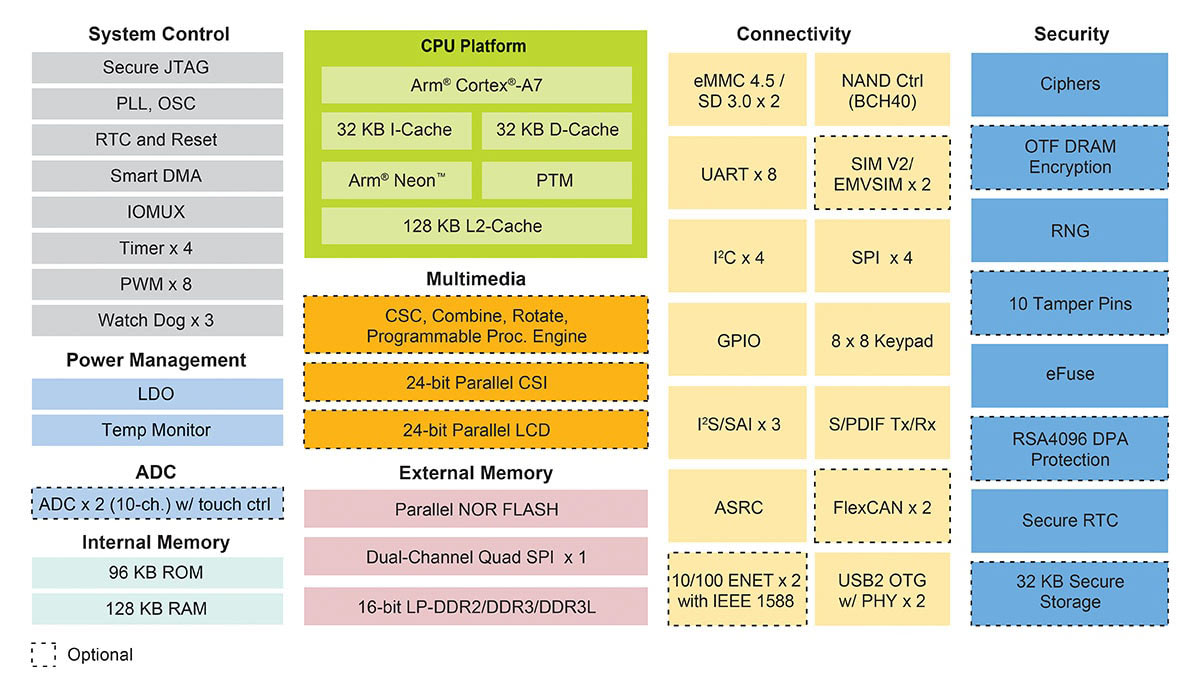
Below is the complete block diagram for the i.MX6UL platform:
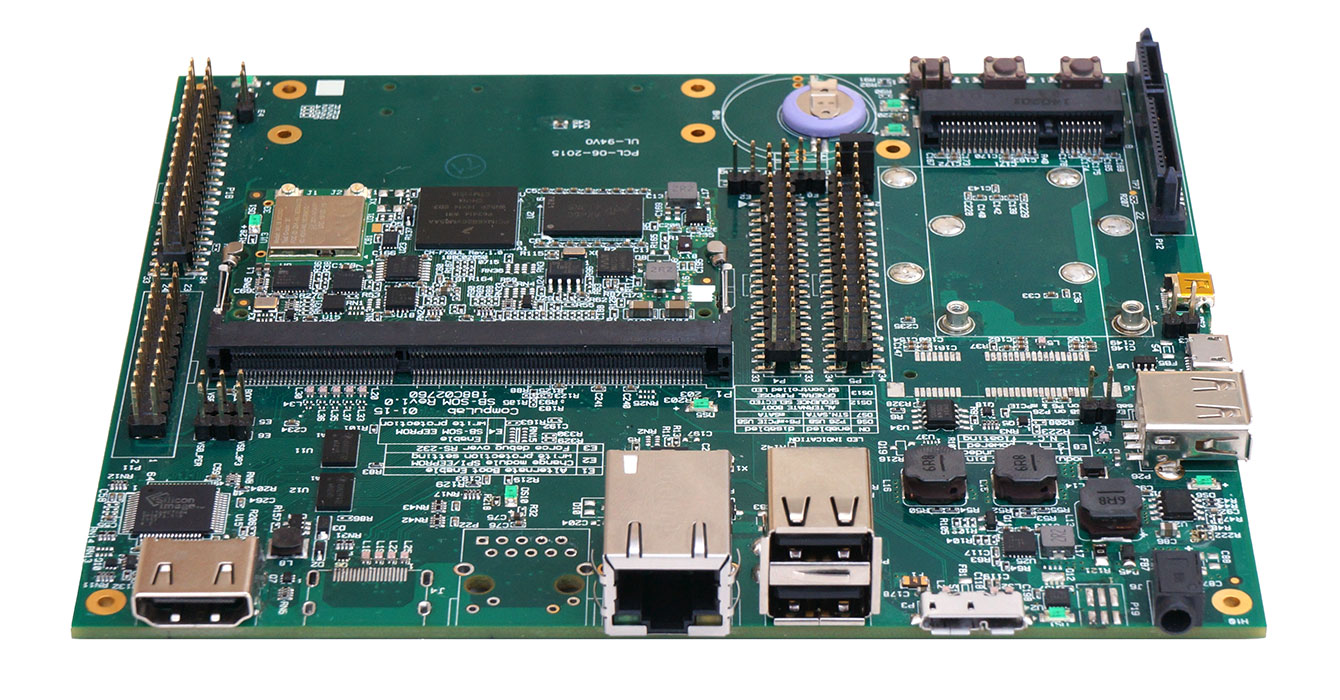
The i.MX6UL Evaluation Kit board looks like this:
Other popular SoC boards are:
Board Support Package
A board support package (BSP) is the minimal set of software packages that demonstrate the capabilities of a certain hardware platform. This normally includes:
- toolchain
- bootloader
- Linux kernel image, device tree files and drivers
- root filesystem
Semiconductor manufacturers usually provide a BSP together with an evaluation board. A BSP is typically bundled using Yocto.
Toolchain
Because our development machines are mostly x86-based we use a cross-compiler that can produce executable code for ARM platform.
We can build our own cross-compiler from scratch using https://crosstool-ng.github.io/ or we can install one:
$ sudo apt-get install gcc-arm-linux-gnueabihf g++-arm-linux-gnueabihf # for arm32
$ sudo apt-get install gcc-aarch64-linux-gnu g++-aarch64-linux-gnu     # for arm64
There are several of toolchain binaries depending on the configuration:
- With
arm-eabi-gccyou have the Linux system C library that will make calls into the kernel IOCTLs, e.g. for allocating memory pages to the process. - With
arm-eabi-none-gccyou are running on platform that doesn't have an operating system at all - so the C library is different to cope with that.
Compiling the Linux Kernel on ARM
Compile the kernel for 32bit ARM boards:
# select defconfig based on your platform
$ ARCH=arm CROSS_COMPILE=arm-linux-gnueabihf- make imx_v6_v7_defconfig
# compile the kernel
$ ARCH=arm CROSS_COMPILE=arm-linux-gnueabihf- make -j8
Compile the kernel for 64bit ARM boards:
# for 64bit ARM there is a single config for all supported boards
$ ARCH=arm CROSS_COMPILE=arm-linux-gnueabihf- make defconfig
# compile the kernel
$ ARCH=arm64 CROSS_COMPILE=aarch64-linux-gnu- make -j8
Linux Kernel Image
The kernel image binary is named vmlinux and is located the root of the kernel tree. Compressed image used for booting can be found under:
arch/arm/boot/Image, for 32-bit ARMarch/arm64/boot/Image, for 64-bit ARM
$ file vmlinux
  vmlinux: ELF 32-bit LSB executable, ARM, EABI5 version 1 (SYSV), statically linked, not stripped

$ file vmlinux
  vmlinux: ELF 64-bit LSB shared object, ARM aarch64, version 1 (SYSV), statically linked, not stripped
rootfs
The root filesystem (rootfs) is the filesystem mounted at the top of files hierarchy (/). It should contain at least
the critical files allowing the system to boot to a shell.
root@so2$ tree -d -L 2
├── bin
├── boot
├── dev
├── etc
├── home
│   └── root
├── lib
│   └── udev
├── mnt
├── proc
├── sbin
│   └── init
├── sys
├── usr
│   ├── bin
│   ├── include
│   ├── lib
└── var
As for x86 we will make use of Yocto rootfs images. To download an ext4 rootfs image for arm32, run:
$ cd tools/labs/
$ ARCH=arm make core-image-minimal-qemuarm.ext4
Device Tree
Device tree (DT) is a tree structure used to describe the hardware devices in a system. Each node in the tree describes a device hence it is called device node. DT was introduced to provide a way to discover non-discoverable hardware (e.g a device on an I2C bus). This information was previously stored inside the source code for the Linux kernel. This meant that each time we needed to modify a node for a device the kernel needed to be recompiled. This no longer holds true as device tree and kernel image are separate binaries now.
Device trees are stored inside device tree sources (.dts) and compiled into device tree blobs (.dtb).
# compile dtbs
$ make dtbs

# location for DT sources on arm32
$ ls arch/arm/boot/dts/
  imx6ul-14x14-evk.dtb imx6ull-14x14-evk.dtb bcm2835-rpi-a-plus.dts

# location for DT source on arm64
$ ls arch/arm64/boot/dts/<vendor>
  imx8mm-evk.dts imx8mp-evk.dts
The following image is a representation of a simple device tree, describing board type, CPU and memory.
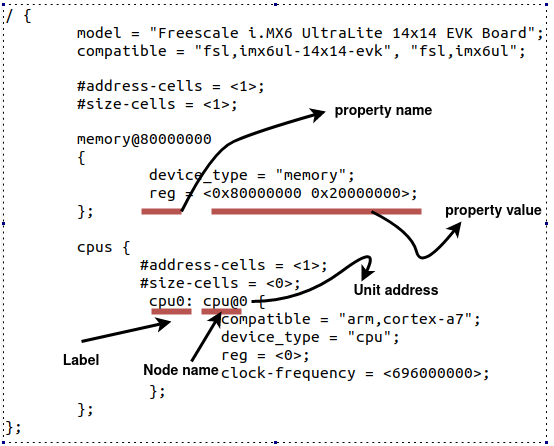
Notice that a device tree node can be defined using label: name@address:
label, is an identifier used to reference the node from other placesname, node identifieraddress, used to differentiate nodes with the same name.
A node might contain several properties arranged in the name = value format. The name is a string
and the value can be bytes, strings, array of strings.
Here is an example:
/ {
     node@0 {
          empty-property;
          string-property = "string value";
          string-list-property = "string value 1", "string value 2";
          int-list-property = <value1 value2>;

          child-node@0 {
                  child-empty-property;
                  child-string-property = "string value";
                  child-node-reference = <&child-node1>;
          };

          child-node1: child-node@1 {
                  child-empty-property;
                  child-string-property = "string value";
          };
   };
};
QEMU
We will use qemu-system-arm to boot 32bit ARM platforms. Although, this can be installed from official distro repos, for example:
sudo apt-get install -y qemu-system-arm
We strongly recommend using latest version of qemu-system-arm build from sources:
$ git clone https://gitlab.com/qemu-project/qemu.git
$ ./configure --target-list=arm-softmmu --disable-docs
$ make -j8
$ ./build/qemu-system-arm
Exercises
Important
To solve exercises, you need to perform these steps:
- prepare skeletons from templates
- build modules
- copy modules to the VM
- start the VM and test the module in the VM.
The current lab name is arm_kernel_development. See the exercises for the task name.
The skeleton code is generated from full source examples located in
tools/labs/templates. To solve the tasks, start by generating
the skeleton code for a complete lab:
tools/labs $ make clean
tools/labs $ LABS=<lab name> make skels
You can also generate the skeleton for a single task, using
tools/labs $ LABS=<lab name>/<task name> make skels
Once the skeleton drivers are generated, build the source:
tools/labs $ make build
Then, copy the modules and start the VM:
tools/labs $ make copy
tools/labs $ make boot
The modules are placed in /home/root/skels/arm_kernel_development/<task_name>.
Alternatively, we can copy files via scp, in order to avoid restarting the VM. For additional details about connecting to the VM via the network, please check Connecting to the Virtual Machine.
Review the Exercises section for more detailed information.
Warning
Before starting the exercises or generating the skeletons, please run git pull inside the Linux repo, to make sure you have the latest version of the exercises.
If you have local changes, the pull command will fail. Check for local changes using git status.
If you want to keep them, run git stash before pull and git stash pop after.
To discard the changes, run git reset --hard master.
If you already generated the skeleton before git pull you will need to generate it again.
Warning
The rules for working with the virtual machine for ARM are modified as follows:
# modules build
tools/labs $ ARCH=arm CROSS_COMPILE=arm-linux-gnueabihf- make build
# modules copy
tools/labs $ ARCH=arm make copy
# kernel build
$ ARCH=arm CROSS_COMPILE=arm-linux-gnueabihf- make -j8
0. Intro
Inspect the following locations in the Linux kernel code and identify platforms and vendors using ARM architecture:
- 32-bit:
arch/arm/boot/dts - 64-bit:
arch/arm64/boot/dts
Use qemu and look at the supported platforms:
../qemu/build/arm-softmmu/qemu-system-arm -M ?
Note
We used our own compiled version of QEMU for arm32. See QEMU section for more details.
1. Boot
Use qemu to boot i.MX6UL platform. In order to boot, we first need to compile the kernel.
Review Compiling the Linux Kernel on ARM section.
Note
LCDIF and ASRC devices are not well supported with QEMU. Remove them from compilation.
$ ARCH=arm CROSS_COMPILE=arm-linux-gnueabihf- make menuconfig
# set FSL_ASRC=n and DRM_MXSFB=n
$ ARCH=arm CROSS_COMPILE=arm-linux-gnueabihf- make -j8
Successful compilation will result in the following binaries:
arch/arm/boot/Image, kernel image compiled for ARMarch/arm/boot/dts/imx6ul-14x14-evk.dtb, device tree blob fori.MX6ULboard
Review rootfs section and download core-image-minimal-qemuarm.ext4 rootfs.
Run qemu using then following command:
../qemu/build/arm-softmmu/qemu-system-arm -M mcimx6ul-evk -cpu cortex-a7 -m 512M \
  -kernel arch/arm/boot/Image -nographic  -dtb arch/arm/boot/dts/imx6ul-14x14-evk.dtb \
  -append "root=/dev/mmcblk0 rw console=ttymxc0 loglevel=8 earlycon printk" -sd tools/labs/core-image-minimal-qemuarm.ext4
Once the kernel is booted check the kernel version and CPU information:
$ cat /proc/version
$ cat /proc/cpuinfo
2. CPU Information
Inspect the CPU configuration for the NXP i.MX6UL board. Start with arch/arm/boot/dts/imx6ul-14x14-evk.dts and go through included files.
Find
cpu@0device tree node and look for theoperating-pointsproperty.Read the maximum and minimum operating frequency the processor can run:
$ cat /sys/devices/system/cpu/cpu0/cpufreq/cpuinfo_min_freq
$ cat /sys/devices/system/cpu/cpu0/cpufreq/cpuinfo_max_freq
3. I/O Memory
Inspect I/O space configuration for the NXP i.MX6UL board. Start with arch/arm/boot/dts/imx6ul-14x14-evk.dts, go through included files, and identify each device mentioned below.
$ cat /sys/devices/system/cpu/cpu0/cpufreq/cpuinfo_min_freq
  00900000-0091ffff : 900000.sram sram@900000
  0209c000-0209ffff : 209c000.gpio gpio@209c000
  021a0000-021a3fff : 21a0000.i2c i2c@21a0000
  80000000-9fffffff : System RAM
Identify device tree nodes corresponding to:
System RAM, look formemory@80000000node inarch/arm/boot/dts/imx6ul-14x14-evk.dtsi. What's the size of the System RAM?GPIO1, look forgpio@209c000node inarch/arm/boot/dts/imx6ul.dtsi. What's the size of the I/O space for this device?I2C1, look fori2c@21a0000node inarch/arm/boot/dts/imx6ul.dtsi. What's the size of the I/O spaces for this device?
4. Hello World
Use the 4-hello/ folder in the lab skeleton folder.
Implement a simple kernel module that prints a message at load/unload time. Compile it and load it on i.MX6UL emulated platform.
# modules build
tools/labs $ ARCH=arm CROSS_COMPILE=arm-linux-gnueabihf- make build
# modules copy
tools/labs $ ARCH=arm make copy
# kernel build
$ ARCH=arm CROSS_COMPILE=arm-linux-gnueabihf- make -j8
5. Simple Device
Use the 5-simple-driver/ folder in the lab skeleton folder.
Implement a driver for a simple platform device. Find TODO 1 and notice how simple_driver is declared and register as a platform driver.
Follow TODO 2 and add the so2,simple-device-v1 and so2,simple-device-v2 compatible strings in the simple_device_ids array.
Create two device tree nodes in arch/arm/boot/dts/imx6ul.dtsi under soc node with compatible strings so2,simple-device-v1 and
so2,simple-device-v2 respectively. Then notice the behavior when loading the simple_driver.ko module.