SO2 Lab 02 - Kernel API
Lab objectives
- Familiarize yourself with the basic Linux kernel API
- Description of memory allocation mechanisms
- Description of locking mechanisms
Overview
Inside the current lab we present a set of concepts and basic functions required for starting Linux kernel programming. It is important to note that kernel programming differs greatly from user space programming. The kernel is a stand-alone entity that can not use libraries in user-space (not even libc). As a result, the usual user-space functions (printf, malloc, free, open, read, write, memcpy, strcpy, etc.) can no longer be used. In conclusion, kernel programming is based on a totally new and independent API that is unrelated to the user-space API, whether we refer to POSIX or ANSI C (standard C language library functions).
Accessing memory
An important difference in kernel programming is how to access and allocate memory. Due to the fact that kernel programming is very close to the physical machine, there are important rules for memory management. First, it works with several types of memory:
- Physical memory
- Virtual memory from the kernel address space
- Virtual memory from a process's address space
- Resident memory - we know for sure that the accessed pages are present in physical memory
Virtual memory in a process's address space can not be considered resident due to the virtual memory mechanisms implemented by the operating system: pages may be swapped or simply may not be present in physical memory as a result of the demand paging mechanism. The memory in the kernel address space can be resident or not. Both the data and code segments of a module and the kernel stack of a process are resident. Dynamic memory may or may not be resident, depending on how it is allocated.
When working with resident memory, things are simple: memory can be accessed at any time. But if working with non-resident memory, then it can only be accessed from certain contexts. Non-resident memory can only be accessed from the process context. Accessing non-resident memory from the context of an interrupt has unpredictable results and, therefore, when the operating system detects such access, it will take drastic measures: blocking or resetting the system to prevent serious corruption.
The virtual memory of a process can not be accessed directly from the kernel. In general, it is totally discouraged to access the address space of a process, but there are situations where a device driver needs to do it. The typical case is where the device driver needs to access a buffer from the user-space. In this case, the device driver must use special features and not directly access the buffer. This is necessary to prevent access to invalid memory areas.
Another difference from the user-space scheduling, relative to memory, is due to the stack, a stack whose size is fixed and limited. A stack of 4K is used in Linux, and a stack of 12K is used in Windows. For this reason, the allocation of large structures on stack or the use of recursive calls should be avoided.
Contexts of execution
In relation to kernel execution, we distinguish two contexts: process context and interrupt context. We are in the process context when we run code as a result of a system call or when we run in the context of a kernel thread. When we run in a routine to handle an interrupt or a deferrable action, we run in an interrupt context.
Some of the kernel API calls can block the current process. Common examples are
using a semaphore or waiting for a condition. In this case, the process is
put into the WAITING state and another process is running. An interesting
situation occurs when a function that can lead to the current process to be
suspended, is called from an interrupt context. In this case, there is no
current process, and therefore the results are unpredictable. Whenever the
operating system detects this condition will generate an error condition that
will cause the operating system to shut down.
Locking
One of the most important features of kernel programming is parallelism. Linux supports SMP systems with multiple processors and kernel preemptivity. This makes kernel programming more difficult because access to global variables must be synchronized with either spinlock primitives or blocking primitives. Although it is recommended to use blocking primitives, they can not be used in an interrupt context, so the only locking solution in the context of an interrupt is spinlocks.
Spinlocks are used in order to achieve mutual exclusion. When it can not get
access to the critical region, it does not suspend the current process, but it
uses the busy-waiting mechanism (waiting in a while() loop for the lock
to be released).
The code that runs in the critical region protected by a spinlock is not allowed
to suspend the current process (it must adhere to the execution conditions in
the interrupt context). Moreover, the CPU will not be released except for
the case of an interrupt. Due to the mechanism used, it is important that a
spinlock is being held as little time as possible.
Preemptivity
Linux uses preemptive kernels. The notion of preemptive multitasking should not be confused with the notion of a preemptive kernel. The notion of preemptive multitasking refers to the fact that the operating system forcefully interrupts a process running in user space when its quantum (time slice) expires, in order to run another process. A kernel is preemptive if a process running in kernel mode (as a result of a system call) can be interrupted so that another process is being run.
Because of preemptivity, when we share resources between two portions of code that can run from different process contexts, we need to protect ourselves with synchronization primitives, even in the case of a single processor.
Linux Kernel API
Convention indicating errors
For Linux kernel programming, the convention used for calling functions to indicate success is the same as in UNIX programming: 0 for success, or a value other than 0 for failure. For failures, negative values are returned as shown in the example below:
if (alloc_memory() != 0)
    return -ENOMEM;

if (user_parameter_valid() != 0)
    return -EINVAL;
The exhaustive list of errors and a summary explanation can be found in
include/uapi/asm-generic/errno-base.h and in
include/uapi/asm-generic/ernno.h.
Strings of characters
In Linux, the kernel programmer is provided with the usual routine functions:
strcpy(), strncpy(), strlcpy(), strcat(),
strncat(), strlcat(), strcmp(), strncmp(),
strnicmp(), strchr(), strnchr(), strrchr(),
strstr(), strlen(), memset(), memmove(),
memcmp(), etc. These functions are declared in the
include/linux/string.h header and are implemented in the kernel in the
lib/string.c file.
printk
The printf equivalent in the kernel is printk, defined in
include/linux/printk.h. The printk() syntax is very similar
to printf(). The first
parameter of printk() decides the log category in which the current log
falls into:
#define KERN_EMERG   "<0>"  /* system is unusable */
#define KERN_ALERT   "<1>"  /* action must be taken immediately */
#define KERN_CRIT    "<2>"  /* critical conditions */
#define KERN_ERR     "<3>"  /* error conditions */
#define KERN_WARNING "<4>"  /* warning conditions */
#define KERN_NOTICE  "<5>"  /* normal but significant condition */
#define KERN_INFO    "<6>"  /* informational */
#define KERN_DEBUG   "<7>"  /* debug-level messages */
Thus, a warning message in the kernel would be sent with:
printk(KERN_WARNING "my_module input string %s\n", buff);
If the logging level is missing from the printk() call, logging is done
with the default level at the time of the call. One thing to keep in mind is
that messages sent with printk() are only visible on the console if and
only if their level exceeds the default level set on the console.
To reduce the size of lines when using printk(), it is recommended to
use the following help functions instead of directly using the printk()
call:
pr_emerg(fmt, ...); /* similar to printk(KERN_EMERG pr_fmt(fmt), ...); */
pr_alert(fmt, ...); /* similar to printk(KERN_ALERT pr_fmt(fmt), ...); */
pr_crit(fmt, ...); /* similar to printk(KERN_CRIT pr_fmt(fmt), ...); */
pr_err(fmt, ...); /* similar to printk(KERN_ERR pr_fmt(fmt), ...); */
pr_warn(fmt, ...); /* similar to printk(KERN_WARNING pr_fmt(fmt), ...); */
pr_notice(fmt, ...); /* similar to printk(KERN_NOTICE pr_fmt(fmt), ...); */
pr_info(fmt, ...); /* similar to printk(KERN_INFO pr_fmt(fmt), ...); */
pr_debug(fmt, ...); /* similar to printk(KERN_DEBUG pr_fmt(fmt), ...); */
A special case is pr_debug() that calls the printk() function
only when the DEBUG macro is defined or if dynamic debugging is used.
Memory allocation
In Linux only resident memory can be allocated, using kmalloc() call.
A typical kmalloc() call is presented below:
#include <linux/slab.h>

string = kmalloc (string_len + 1, GFP_KERNEL);
if (!string) {
    //report error: -ENOMEM;
}
As you can see, the first parameter indicates the size in bytes of the allocated
area. The function returns a pointer to a memory area that can be directly used
in the kernel, or NULL if memory could not be allocated. The second
parameter specifies how allocation should be done and the most commonly used
values for this are:
GFP_KERNEL- using this value may cause the current process to be suspended. Thus, it can not be used in the interrupt context.GFP_ATOMIC- using this value it ensures that thekmalloc()function does not suspend the current process. It can be used anytime.
The counterpart to the kmalloc() function is kfree(), a function
that receives as argument an area allocated by kmalloc(). This function
does not suspend the current process and can therefore be called from any
context.
lists
Because linked lists are often used, the Linux kernel API provides a unified
way of defining and using lists. This involves using a
struct list_head element in the structure we want to consider as a
list node. The struct list_head is defined in
include/linux/list.h along with all the other functions that manipulate
the lists. The following code shows the definition of
the struct list_head and the use of an element of this type in another
well-known structure in the Linux kernel:
struct list_head {
    struct list_head *next, *prev;
};

struct task_struct {
    ...
    struct list_head children;
    ...
};
The usual routines for working with lists are the following:
LIST_HEAD(name)is used to declare the sentinel of a listINIT_LIST_HEAD(struct list_head *list)()is used to initialize the sentinel of a list when dynamic allocation is made, by setting the value of thenextandprevto list fields.list_add(struct list_head *new, struct list_head *head)()adds thenewelement after theheadelement.list_del(struct list_head *entry)()deletes the item at theentryaddress of the list it belongs to.list_entry(ptr, type, member)returns the structure with the typetypethat contains the elementptrfrom the list, having the namememberwithin the structure.list_for_each(pos, head)iterates over a list usingposas a cursor.list_for_each_safe(pos, n, head)iterates over a list usingposas a cursor andnas a temporary cursor. This macro is used to delete an item from the list.
The following code shows how to use these routines:
#include <linux/slab.h>
#include <linux/list.h>

struct pid_list {
    pid_t pid;
    struct list_head list;
};

LIST_HEAD(my_list);

static int add_pid(pid_t pid)
{
    struct pid_list *ple = kmalloc(sizeof *ple, GFP_KERNEL);

    if (!ple)
        return -ENOMEM;

    ple->pid = pid;
    list_add(&ple->list, &my_list);

    return 0;
}

static int del_pid(pid_t pid)
{
    struct list_head *i, *tmp;
    struct pid_list *ple;

    list_for_each_safe(i, tmp, &my_list) {
        ple = list_entry(i, struct pid_list, list);
        if (ple->pid == pid) {
            list_del(i);
            kfree(ple);
            return 0;
        }
    }

    return -EINVAL;
}

static void destroy_list(void)
{
    struct list_head *i, *n;
    struct pid_list *ple;

    list_for_each_safe(i, n, &my_list) {
        ple = list_entry(i, struct pid_list, list);
        list_del(i);
        kfree(ple);
    }
}
The evolution of the list can be seen in the following figure:
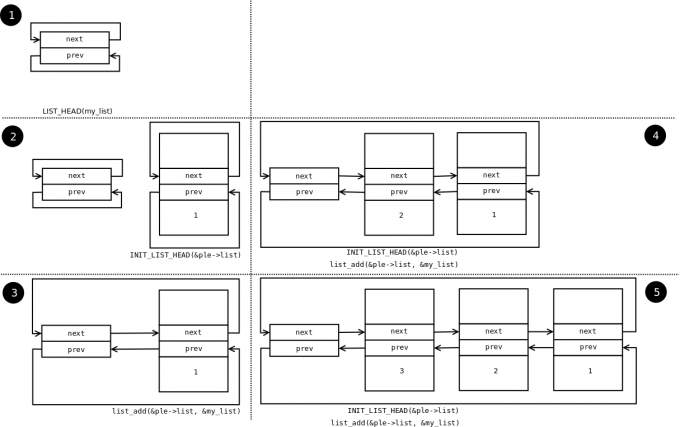
You see the stack type behavior introduced by the list_add macro,
and the use of a sentinel.
From the above example, it can be noticed that the way to define and use a list
(double-linked) is generic and, at the same time, it does not introduce an
additional overhead. The struct list_head is used to maintain the
links between the list elements. It can be noticed that iterating over the list
is also done with this structure, and that retrieving a list element can be done
using list_entry. This idea of implementing and using a list is not
new, as it has already been described in The Art of Computer Programming by
Donald Knuth in the 1980s.
Several kernel list functions and macro definitions are presented and explained
in the include/linux/list.h header.
Spinlock
spinlock_t (defined in linux/spinlock.h) is the basic type
that implements the spinlock concept in Linux. It describes a spinlock, and the
operations associated with a spinlock are spin_lock_init(),
spin_lock(), spin_unlock(). An example of use is given below:
#include <linux/spinlock.h>

DEFINE_SPINLOCK(lock1);
spinlock_t lock2;

spin_lock_init(&lock2);

spin_lock(&lock1);
/* critical region */
spin_unlock(&lock1);

spin_lock(&lock2);
/* critical region */
spin_unlock(&lock2);
In Linux, you can use reader-writer spinlocks, useful for readers-writers
problems.
These types of locks are identified by rwlock_t, and the functions
that can work on a reader-writer spinlock are
rwlock_init(),
read_lock(),
write_lock().
An example of use:
#include <linux/spinlock.h>

DEFINE_RWLOCK(lock);

struct pid_list {
    pid_t pid;
    struct list_head list;
};

int have_pid(struct list_head *lh, int pid)
{
    struct list_head *i;
    void *elem;

    read_lock(&lock);
    list_for_each(i, lh) {
        struct pid_list *pl = list_entry(i, struct pid_list, list);
        if (pl->pid == pid) {
            read_unlock(&lock);
            return 1;
        }
    }
    read_unlock(&lock);

    return 0;
}

void add_pid(struct list_head *lh, struct pid_list *pl)
{
    write_lock(&lock);
    list_add(&pl->list, lh);
    write_unlock(&lock);
}
mutex
A mutex is a variable of the struct mutex type (defined in
linux/mutex.h).
Functions and macros for working with mutexes are listed below:
#include <linux/mutex.h>

/* functions for mutex initialization */
void mutex_init(struct mutex *mutex);
DEFINE_MUTEX(name);

/* functions for mutex acquire */
void mutex_lock(struct mutex *mutex);

/* functions for mutex release */
void mutex_unlock(struct mutex *mutex);
Operations are similar to classic mutex operations in user-space or spinlock operations: the mutex is acquired before entering the critical region and it is released after exiting the critical region. Unlike spinlocks, these operations can only be used in process context.
Atomic variables
Often, you only need to synchronize access to a simple variable, such as a
counter. For this, an atomic_t type can be used (defined in
include/linux/atomic.h), that holds an integer value. Below are some
operations that can be performed on an atomic_t variable.
#include <asm/atomic.h>

void atomic_set(atomic_t *v, int i);
int atomic_read(atomic_t *v);
void atomic_add(int i, atomic_t *v);
void atomic_sub(int i, atomic_t *v);
void atomic_inc(atomic_t *v);
void atomic_dec(atomic_t *v);
int atomic_inc_and_test(atomic_t *v);
int atomic_dec_and_test(atomic_t *v);
int atomic_cmpxchg(atomic_t *v, int old, int new);
Use of atomic variables
A common way of using atomic variables is to store the status of an action (e.g. a flag). So we can use an atomic variable to mark exclusive actions. For example, we consider that an atomic variable can have the LOCKED and UNLOCKED values, and if the respective variable equals LOCKED then a specific function should return -EBUSY. Such an usage is shown schematically in the code below:
#define LOCKED       0
#define UNLOCKED     1

static atomic_t flag;

static int my_acquire(void)
{
     int initial_flag;

     /*
      * Check if flag is UNLOCKED; if so, lock it and do it atomically.
      *
      * This is the atomic equivalent of
      *      if (flag == UNLOCKED)
      *              flag = LOCKED;
      *      else
      *              return -EBUSY;
      */
     initial_flag = atomic_cmpxchg(&flag, UNLOCKED, LOCKED);
     if (initial_flag == LOCKED) {
             printk(KERN_ALERT "Already locked.\n");
             return -EBUSY;
     }

     /* Do your thing after getting the lock. */
     [...]
}

static void my_release(void)
{
     /* Release flag; mark it as unlocked. */
     atomic_set(&flag, UNLOCKED);
}

void my_init(void)
{
     [...]
     /* Atomic variable is initially unlocked. */
     atomic_set(&flag, UNLOCKED);

     [...]
}
The above code is the equivalent of using a trylock (such as
pthread_mutex_trylock()).
We can also use a variable to store the size of a buffer and for atomic updates of the respective variable. The code below is such an example:
static unsigned char buffer[MAX_SIZE];
static atomic_t size;

static void add_to_buffer(unsigned char value)
{
     buffer[atomic_read(&size)] = value;
     atomic_inc(&size);
}

static unsigned char remove_from_buffer(void)
{
     unsigned char value;

     value = buffer[atomic_read(&size)];
     atomic_dec(&size);

     return value
}

static void reset_buffer(void)
{
     atomic_set(&size, 0);
}

void my_init(void)
{
     [...]
     /* Initialized buffer and size. */
     atomic_set(&size, 0);
     memset(buffer, 0, sizeof(buffer));

     [...]
}
Atomic bitwise operations
The kernel provides a set of functions (in asm/bitops.h) that modify or
test bits in an atomic way.
#include <asm/bitops.h>

void set_bit(int nr, void *addr);
void clear_bit(int nr, void *addr);
void change_bit(int nr, void *addr);
int test_and_set_bit(int nr, void *addr);
int test_and_clear_bit(int nr, void *addr);
int test_and_change_bit(int nr, void *addr);
Addr represents the address of the memory area whose bits are being
modified or tested and nr is the bit on which the operation is
performed.
Exercises
Important
We strongly encourage you to use the setup from this repository.
- To solve exercises, you need to perform these steps:
- prepare skeletons from templates
- build modules
- start the VM and test the module in the VM.
The current lab name is kernel_api. See the exercises for the task name.
The skeleton code is generated from full source examples located in
tools/labs/templates. To solve the tasks, start by generating
the skeleton code for a complete lab:
tools/labs $ make clean
tools/labs $ LABS=<lab name> make skels
You can also generate the skeleton for a single task, using
tools/labs $ LABS=<lab name>/<task name> make skels
Once the skeleton drivers are generated, build the source:
tools/labs $ make build
Then, start the VM:
tools/labs $ make console
The modules are placed in /home/root/skels/kernel_api/<task_name>.
You DO NOT need to STOP the VM when rebuilding modules! The local skels directory is shared with the VM.
Review the Exercises section for more detailed information.
Warning
Before starting the exercises or generating the skeletons, please run git pull inside the Linux repo, to make sure you have the latest version of the exercises.
If you have local changes, the pull command will fail. Check for local changes using git status.
If you want to keep them, run git stash before pull and git stash pop after.
To discard the changes, run git reset --hard master.
If you already generated the skeleton before git pull you will need to generate it again.
0. Intro
Using LXR find the definitions of the following symbols in the Linux kernel:
struct list_headINIT_LIST_HEAD()list_add()list_for_eachlist_entrycontainer_ofoffsetof
1. Memory allocation in Linux kernel
Generate the skeleton for the task named 1-mem and browse the
contents of the mem.c file. Observe the use of kmalloc()
call for memory allocation.
- Compile the source code and load the
mem.komodule using insmod.- View the kernel messages using the dmesg command.
- Unload the kernel module using the rmmod mem command.
Note
Review the Memory Allocation section in the lab.
2. Sleeping in atomic context
Generate the skeleton for the task named 2-sched-spin and browse
the contents of the sched-spin.c file.
- Compile the source code and load the module, according the above info: (make build and make copy)
- Notice that it is waiting for 5 seconds until the insertion order is complete.
- Unload the kernel module.
- Look for the lines marked with:
TODO 0to create an atomic section. Re-compile the source code and reload the module into the kernel.
You should now get an error. Look at the stack trace. What is the cause of the error?
Hint
In the error message, follow the line containing the BUG
for a description of the error. You are not allowed to sleep in
atomic context. The atomic context is given by a section
between a lock operation and an unlock on a spinlock.
Note
The
schedule_timeout() function, corroborated with the
set_current_state macro, forces the current process to wait
for 5 seconds.
Note
Review the Contexts of execution, Locking and Spinlock sections.
3. Working with kernel memory
Generate the skeleton for the task named 3-memory directory and
browse the contents of the memory.c file. Notice the comments
marked with TODO. You must allocate 4 structures of type struct
task_info and initialize them (in memory_init()), then print and
free them (in memory_exit()).
(TODO 1) Allocate memory for
struct task_infostructure and initialize its fields:
- The
pidfield to the PID transmitted as a parameter;- The
timestampfield to the value of thejiffiesvariable, which holds the number of ticks that have occurred since the system booted.(TODO 2) Allocate
struct task_infofor the current process, the parent process, the next process, the next process of the next process, with the following information:
- PID of the current process, which can be retrieved from
struct task_structstructure, returned bycurrentmacro.Hint
Search for
pidintask_struct.
- PID of the parent process of the current process.
Hint
Search for the relevant field from
struct task_structstructure. Look after "parent".
- PID of the next process from the list of processes, relative to the current process.
Hint
Use
next_taskmacro, which returns a pointer to the next process (i.e astruct task_structstructure).
- PID of the next process of the next process, relative to the current process.
Hint
Call the
next_taskmacro 2 times.(TODO 3) Display the four structures.
- Use
printk()to display their two fields:
pidandtimestamp.(TODO 4) Release the memory occupied by the structures (use
kfree()).
Hint
- You can access the current process using
currentmacro. - Look for the relevant fields in the
struct task_structstructure (pid,parent). - Use the
next_taskmacro. The macro returns the pointer to the next process (ie. astruct task_struct*structure).
Note
The struct task_struct structure contains two fields to
designate the parent of a task:
real_parentpoints to the process that created the task or to process with pid 1 (init) if the parent completed its execution.parentindicates to the current task parent (the process that will be reported if the task completes execution).
In general, the values of the two fields are the same, but
there are situations where they differ, for example when
using the ptrace() system call.
Hint
Review the Memory allocation section in the lab.
4. Working with kernel lists
Generate the skeleton for the task named 4-list. Browse the
contents of the list.c file and notice the comments marked with
TODO. The current process will add the four structures from the
previous exercise into a list. The list will be built in the
task_info_add_for_current() function which is called when module is
loaded. The list will be printed and deleted in the list_exit()
function and the task_info_purge_list() function.
- (TODO 1) Complete the
task_info_add_to_list()function to allocate astruct task_infostructure and add it to the list.- (TODO 2) Complete the
task_info_purge_list()function to delete all the elements in the list.- Compile the kernel module. Load and unload the module by following the messages displayed by the kernel.
Hint
Review the labs Lists section. When deleting items from
the list, you will need to use either the
list_for_each_safe or list_for_each_entry_safe
macros.
5. Working with kernel lists for process handling
Generate the skeleton for the task named 5-list-full. Browse the
contents of the list-full.c and notice comments marked with
TODO. In addition to the 4-list functionality we add the
following:
A
countfield showing how many times a process has been "added" to the list.If a process is "added" several times, no new entry is created in the list, but:
- Update the
timestampfield.- Increment
count.To implement the counter facility, add a
task_info_find_pid()function that searches for a pid in the existing list.If found, return the reference to the
task_infostruct. If not, returnNULL.An expiration facility. If a process was added more than 3 seconds ago and if it does not have a
countgreater than 5 then it is considered expired and is removed from the list.The expiration facility is already implemented in the
task_info_remove_expired()function.
(TODO 1) Implement the
task_info_find_pid()function.(TODO 2) Change a field of an item in the list so it does not expire. It must not satisfy a part of the expiration condition from
task_info_remove_expired().Hint
For
TODO 2, extract the first element from the list (the one referred byhead.next) and set thecountfield to a large enough value. Useatomic_set()function.Compile, copy, load and unload the kernel module following the displayed messages. Kernel module loading will take some time, because
sleep()is being called byschedule_timeout()function.
6. Synchronizing list work
Generate the skeleton for the task named 6-list-sync.
- Browse the code and look for
TODO 1string.- Use a spinlock or a read-write lock to synchronize access to the list.
- Compile, load and unload the kernel module.
Important
Always lock data, not code!
Note
Read Spinlock section of the lab.
7. Test module calling in our list module
Generate the skeleton for the task named 7-list-test and browse
the contents of the list-test.c file. We'll use it as a test
module. It will call functions exported by the 6-list-sync
task. The exported functions are the ones marked with extern in
list-test.c file.
Uncomment the commented code from 7-list-test.c. Look for TODO 1.
To export the above functions from the module located at 6-list-sync/
directory, the following steps are required:
- Functions must not be static.
- Use the
EXPORT_SYMBOLmacro to export the kernel symbols. For example:EXPORT_SYMBOL(task_info_remove_expired);. The macro must be used for each function after the function is defined. Browse the code and look for theTODO 2string in thelist-sync.c.- Remove from the module from 6-list-sync the code that avoids the expiration of a list item (it is in contradiction to our exercise).
- Compile and load the module from
6-list-sync/. Once loaded, it exposes exported functions and can be used by the test module. You can check this by searching for the function names in/proc/kallsymsbefore and after loading the module.- Compile the test module and then load it.
- Use lsmod to check that the two modules have been loaded. What do you notice?
- Unload the kernel test module.
What should be the unload order of the two modules (the module from 6-list-sync and the test module)? What happens if you use another order?