SO2 Lab 03 - Character device drivers
Laboratory objectives
- understand the concepts behind character device driver
- understand the various operations that can be performed on character devices
- working with waiting queues
Overview
In UNIX, hardware devices are accessed by the user through special device
files. These files are grouped into the /dev directory, and system calls
open, read, write, close, lseek, mmap etc. are
redirected by the operating system to the device driver associated with the
physical device. The device driver is a kernel component (usually a module)
that interacts with a hardware device.
In the UNIX world there are two categories of device files and thus device drivers: character and block. This division is done by the speed, volume and way of organizing the data to be transferred from the device to the system and vice versa. In the first category, there are slow devices, which manage a small amount of data, and access to data does not require frequent seek queries. Examples are devices such as keyboard, mouse, serial ports, sound card, joystick. In general, operations with these devices (read, write) are performed sequentially byte by byte. The second category includes devices where data volume is large, data is organized on blocks, and search is common. Examples of devices that fall into this category are hard drives, cdroms, ram disks, magnetic tape drives. For these devices, reading and writing is done at the data block level.
For the two types of device drivers, the Linux kernel offers different APIs. If for character devices system calls go directly to device drivers, in case of block devices, the drivers do not work directly with system calls. In the case of block devices, communication between the user-space and the block device driver is mediated by the file management subsystem and the block device subsystem. The role of these subsystems is to prepare the device driver's necessary resources (buffers), to keep the recently read data in the cache buffer, and to order the read and write operations for performance reasons.
Majors and minors
In UNIX, the devices traditionally had a unique, fixed identifier associated with them. This tradition is preserved in Linux, although identifiers can be dynamically allocated (for compatibility reasons, most drivers still use static identifiers). The identifier consists of two parts: major and minor. The first part identifies the device type (IDE disk, SCSI disk, serial port, etc.) and the second one identifies the device (first disk, second serial port, etc.). Most times, the major identifies the driver, while the minor identifies each physical device served by the driver. In general, a driver will have a major associate and will be responsible for all minors associated with that major.
$ ls -la /dev/hda? /dev/ttyS?
brw-rw----  1 root disk    3,  1 2004-09-18 14:51 /dev/hda1
brw-rw----  1 root disk    3,  2 2004-09-18 14:51 /dev/hda2
crw-rw----  1 root dialout 4, 64 2004-09-18 14:52 /dev/ttyS0
crw-rw----  1 root dialout 4, 65 2004-09-18 14:52 /dev/ttyS1
As can be seen from the example above, device-type information can be found
using the ls command. The special character files are identified by the c
character in the first column of the command output, and the block type by the
character b. In columns 5 and 6 of the result you can see the
major, respectively the minor for each device.
Certain major identifiers are statically assigned to devices (in the
Documentation/admin-guide/devices.txt file from the kernel sources). When choosing the
identifier for a new device, you can use two methods: static (choose a number
that does not seem to be used already) or dynamically. In /proc/devices are the
loaded devices, along with the major identifier.
To create a device type file, use the mknod command; the command receives the
type (block or character), major and minor of the device
(mknod name type major minor). Thus, if you want to create a character device
named mycdev with the major 42 and minor 0, use the command:
# mknod /dev/mycdev c 42 0
To create the block device with the name mybdev with the major 240 and minor 0
the command will be:
# mknod /dev/mybdev b 240 0
Next, we'll refer to character devices as drivers.
Data structures for a character device
In the kernel, a character-type device is represented by
struct cdev, a structure used to register it in the
system. Most driver operations use three important structures:
struct file_operations, struct file and struct inode.
struct file_operations
As mentioned above, the character device drivers receive unaltered system calls
made by users over device-type files. Consequently, implementation of a character
device driver means implementing the system calls specific to files: open,
close, read, write, lseek, mmap, etc. These operations are
described in the fields of the struct file_operations structure:
#include <linux/fs.h>

struct file_operations {
    struct module *owner;
    loff_t (*llseek) (struct file *, loff_t, int);
    ssize_t (*read) (struct file *, char __user *, size_t, loff_t *);
    ssize_t (*write) (struct file *, const char __user *, size_t, loff_t *);
    [...]
    long (*unlocked_ioctl) (struct file *, unsigned int, unsigned long);
    [...]
    int (*open) (struct inode *, struct file *);
    int (*flush) (struct file *, fl_owner_t id);
    int (*release) (struct inode *, struct file *);
    [...]
It can be noticed that the signature of the function differs from the system call that the user uses. The operating system sits between the user and the device driver to simplify implementation in the device driver.
open does not receive the parameter path or the various parameters that control
the file opening mode. Similarly, read, write, release, ioctl, lseek
do not receive as a parameter a file descriptor. Instead, these routines receive as
parameters two structures: file and inode. Both structures represent a file,
but from different perspectives.
- Most parameters for the presented operations have a direct meaning:
fileandinodeidentifies the device type file;sizeis the number of bytes to be read or written;offsetis the displacement to be read or written (to be updated accordingly);user_bufferuser buffer from which it reads / writes;whenceis the way to seek (the position where the search operation starts);cmdandargare the parameters sent by the users to the ioctl call (IO control).
inode and file structures
An inode represents a file from the point of view of the file system. Attributes
of an inode are the size, rights, times associated with the file. An inode uniquely
identifies a file in a file system.
The file structure is still a file, but closer to the user's point of view.
From the attributes of the file structure we list: the inode, the file name,
the file opening attributes, the file position. All open files at a given time
have associated a file structure.
To understand the differences between inode and file, we will use an analogy from object-oriented programming: if we consider a class inode, then the files are objects, that is, instances of the inode class. Inode represents the static image of the file (the inode has no state), while the file represents the dynamic image of the file (the file has state).
Returning to device drivers, the two entities have almost always standard ways of using: the inode is used to determine the major and minor of the device on which the operation is performed, and the file is used to determine the flags with which the file was opened, but also to save and access (later) private data.
The file structure contains, among many fields:
f_mode, which specifies read (FMODE_READ) or write (FMODE_WRITE);f_flags, which specifies the file opening flags (O_RDONLY,O_NONBLOCK,O_SYNC,O_APPEND,O_TRUNC, etc.);f_op, which specifies the operations associated with the file (pointer to thefile_operationsstructure );private_data, a pointer that can be used by the programmer to store device-specific data; The pointer will be initialized to a memory location assigned by the programmer.f_pos, the offset within the file
The inode structure contains, among much information, an i_cdev
field, which is a pointer to the structure that defines the character
device (when the inode corresponds to a character device).
Implementation of operations
To implement a device driver, it is recommended that you create a structure that contains information about the device, information used in the module. In the case of a driver for a character device, the structure will contain a cdev structure field to refer to the device. The following example uses the struct my_device_data:
#include <linux/fs.h>
#include <linux/cdev.h>

struct my_device_data {
    struct cdev cdev;
    /* my data starts here */
    //...
};

static int my_open(struct inode *inode, struct file *file)
{
    struct my_device_data *my_data;

    my_data = container_of(inode->i_cdev, struct my_device_data, cdev);

    file->private_data = my_data;
    //...
}

static int my_read(struct file *file, char __user *user_buffer, size_t size, loff_t *offset)
{
    struct my_device_data *my_data;

    my_data = (struct my_device_data *) file->private_data;

    //...
}
A structure like my_device_data will contain the data associated with a device.
The cdev field (cdev type) is a character-type device and is used to record it
in the system and identify the device. The pointer to the cdev member can be
found using the i_cdev field of the inode structure (using the container_of
macro). In the private_data field of the file structure, information can be
stored at open which is then available in the read, write, release, etc.
routines.
Registration and unregistration of character devices
The registration/unregistration of a device is made by specifying the major and
minor. The dev_t type is used to keep the identifiers of a device (both major
and minor) and can be obtained using the MKDEV macro.
For the static assignment and unallocation of device identifiers, the
register_chrdev_region and unregister_chrdev_region functions are used:
#include <linux/fs.h>

int register_chrdev_region(dev_t first, unsigned int count, char *name);
void unregister_chrdev_region(dev_t first, unsigned int count);
It is recommended that device identifiers be dynamically assigned to the
alloc_chrdev_region function.
Below sequence reserves my_minor_count devices, starting with my_major
major and my_first_minor minor (if the max value for minor is exceeded,
move to the next major):
#include <linux/fs.h>
...

err = register_chrdev_region(MKDEV(my_major, my_first_minor), my_minor_count,
                             "my_device_driver");
if (err != 0) {
    /* report error */
    return err;
}
...
After assigning the identifiers, the character device will have to be
initialized (cdev_init) and the kernel will have to be notified(cdev_add). The
cdev_add function must be called only after the device is ready to receive
calls. Removing a device is done using the cdev_del function.
#include <linux/cdev.h>

void cdev_init(struct cdev *cdev, struct file_operations *fops);
int cdev_add(struct cdev *dev, dev_t num, unsigned int count);
void cdev_del(struct cdev *dev);
The following sequence registers and initializes MY_MAX_MINORS devices:
#include <linux/fs.h>
#include <linux/cdev.h>

#define MY_MAJOR       42
#define MY_MAX_MINORS  5

struct my_device_data {
    struct cdev cdev;
    /* my data starts here */
    //...
};

struct my_device_data devs[MY_MAX_MINORS];

const struct file_operations my_fops = {
    .owner = THIS_MODULE,
    .open = my_open,
    .read = my_read,
    .write = my_write,
    .release = my_release,
    .unlocked_ioctl = my_ioctl
};

int init_module(void)
{
    int i, err;

    err = register_chrdev_region(MKDEV(MY_MAJOR, 0), MY_MAX_MINORS,
                                 "my_device_driver");
    if (err != 0) {
        /* report error */
        return err;
    }

    for(i = 0; i < MY_MAX_MINORS; i++) {
        /* initialize devs[i] fields */
        cdev_init(&devs[i].cdev, &my_fops);
        cdev_add(&devs[i].cdev, MKDEV(MY_MAJOR, i), 1);
    }

    return 0;
}
While the following sequence deletes and unregisters them:
void cleanup_module(void)
{
    int i;

    for(i = 0; i < MY_MAX_MINORS; i++) {
        /* release devs[i] fields */
        cdev_del(&devs[i].cdev);
    }
    unregister_chrdev_region(MKDEV(MY_MAJOR, 0), MY_MAX_MINORS);
}
Note
Initialization of the struct my_fops used the initialization
of members by name, defined in C99 standard (see designated
initializers and the file_operations structure). Structure
members who do not explicitly appear in this initialization
will be set to the default value for their type. For
example, after the initialization above, my_fops.mmap will
be NULL.
Access to the address space of the process
A driver for a device is the interface between an application and hardware. As a result, we often have to access user-space data. Accessing it can not be done directly (by dereferencing a user-space pointer). Direct access of a user-space pointer can lead to incorrect behavior (depending on architecture, a user-space pointer may not be valid or mapped to kernel-space), a kernel oops (the user-mode pointer can refer to a non-resident memory area) or security issues. Proper access to user-space data is done by calling the macros / functions below:
#include <asm/uaccess.h>

put_user(type val, type *address);
get_user(type val, type *address);
unsigned long copy_to_user(void __user *to, const void *from, unsigned long n);
unsigned long copy_from_user(void *to, const void __user *from, unsigned long n);
All macros / functions return 0 in case of success and another value in case of error and have the following roles:
put_userstore the valuevalto user-space addressaddress; Type can be one on 8, 16, 32, 64 bit (the maximum supported type depends on the hardware platform);get_useranalogue to the previous function, only that val will be set to a value identical to the value at the user-space address given by address;copy_to_usercopiesnbytes from the kernel-space, from the address referenced byfromin user-space to the address referenced byto;copy_from_usercopiesnbytes from user-space from the address referenced byfromin kernel-space to the address referenced byto.
A common section of code that works with these functions is:
#include <asm/uaccess.h>

/*
 * Copy at most size bytes to user space.
 * Return ''0'' on success and some other value on error.
 */
if (copy_to_user(user_buffer, kernel_buffer, size))
    return -EFAULT;
else
    return 0;
Open and release
The open function performs the initialization of a device. In most cases,
these operations refer to initializing the device and filling in specific data
(if it is the first open call). The release function is about releasing
device-specific resources: unlocking specific data and closing the device if
the last call is close.
In most cases, the open function will have the following structure:
static int my_open(struct inode *inode, struct file *file)
{
    struct my_device_data *my_data =
             container_of(inode->i_cdev, struct my_device_data, cdev);

    /* validate access to device */
    file->private_data = my_data;

    /* initialize device */
    ...

    return 0;
}
A problem that occurs when implementing the open function is access control.
Sometimes a device needs to be opened once at a time; More specifically, do not
allow the second open before the release. To implement this restriction, you
choose a way to handle an open call for an already open device: it can return
an error (-EBUSY), block open calls until a release operation, or shut down
the device before do the open.
At the user-space call of the open and close functions on the device, call my_open and my_release in the driver. An example of a user-space call:
int fd = open("/dev/my_device", O_RDONLY);
if (fd < 0) {
    /* handle error */
}

/* do work */
//..

close(fd);
Read and write
The read and write operations are reaching the device driver as a result of an user-space program calling the read or write system calls:
if (read(fd, buffer, size) < 0) {
    /* handle error */
}

if (write(fd, buffer, size) < 0) {
    /* handle error */
}
The read and write functions transfer data between the device and the
user-space: the read function reads the data from the device and transfers it
to the user-space, while writing reads the user-space data and writes it to the
device. The buffer received as a parameter is a user-space pointer, which is
why it is necessary to use the copy_to_user or copy_from_user functions.
The value returned by read or write can be:
- the number of bytes transferred; if the returned value is less than the size parameter (the number of bytes requested), then it means that a partial transfer was made. Most of the time, the user-space app calls the system call (read or write) function until the required data number is transferred.
- 0 to mark the end of the file in the case of read ; if write returns the value 0 then it means that no byte has been written and that no error has occurred; In this case, the user-space application retries the write call.
- a negative value indicating an error code.
To perform a data transfer consisting of several partial transfers, the following operations should be performed:
- transfer the maximum number of possible bytes between the buffer received as a parameter and the device (writing to the device/reading from the device will be done from the offset received as a parameter);
- update the offset received as a parameter to the position from which the next read / write data will begin;
- return the number of bytes transferred.
The sequence below shows an example for the read function that takes into account the internal buffer size, user buffer size and the offset:
static int my_read(struct file *file, char __user *user_buffer,
                   size_t size, loff_t *offset)
{
    struct my_device_data *my_data = (struct my_device_data *) file->private_data;
    ssize_t len = min(my_data->size - *offset, size);

    if (len <= 0)
        return 0;

    /* read data from my_data->buffer to user buffer */
    if (copy_to_user(user_buffer, my_data->buffer + *offset, len))
        return -EFAULT;

    *offset += len;
    return len;
}
The images below illustrate the read operation and how data is transferred between the user-space and the driver:
- when the driver has enough data available (starting with the OFFSET position) to accurately transfer the required size (SIZE) to the user.
- when a smaller amount is transferred than required.
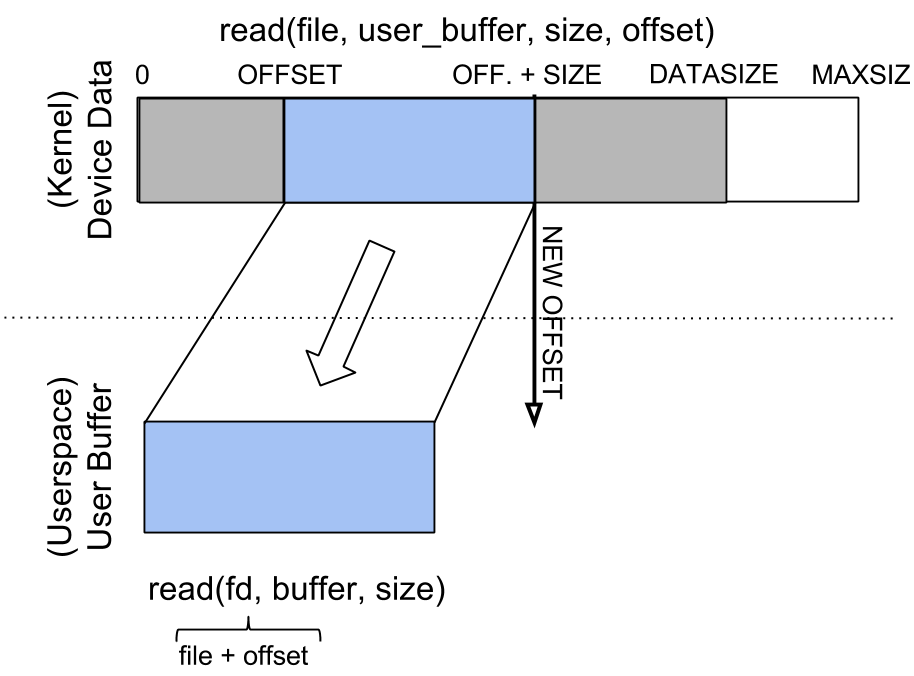
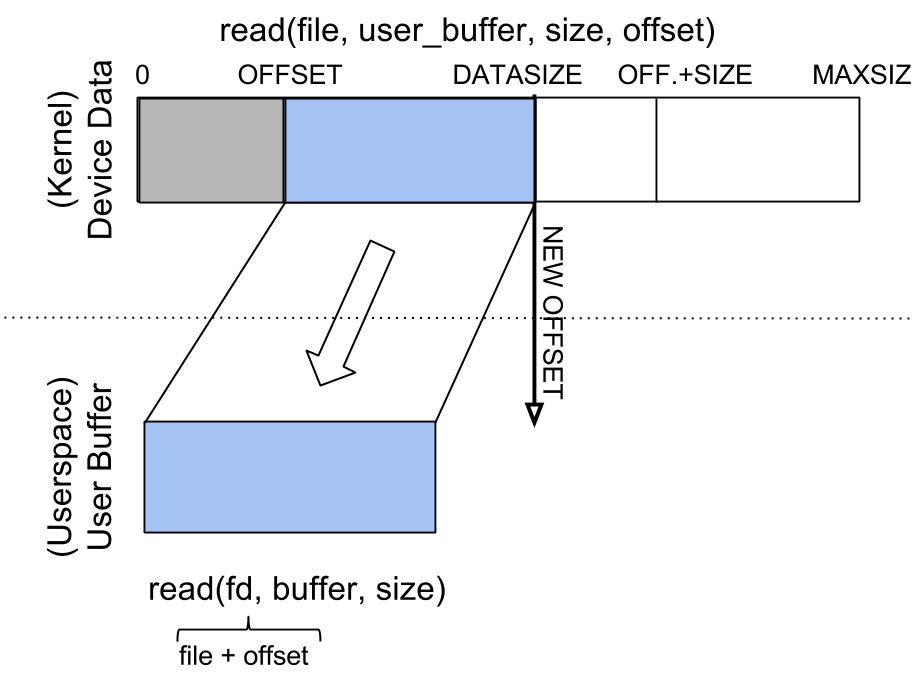
We can look at the read operation implemented by the driver as a response to a user-space read request. In this case, the driver is responsible for advancing the offset according to how much it reads and returning the read size (which may be less than what is required).
The structure of the write function is similar:
static int my_write(struct file *file, const char __user *user_buffer,
                    size_t size, loff_t * offset)
{
    struct my_device_data *my_data = (struct my_device_data *) file->private_data;
    ssize_t len = min(my_data->size - *offset, size);

    if (len <= 0)
        return 0;

    /* read data from user buffer to my_data->buffer */
    if (copy_from_user(my_data->buffer + *offset, user_buffer, len))
        return -EFAULT;

    *offset += len;
    return len;
}
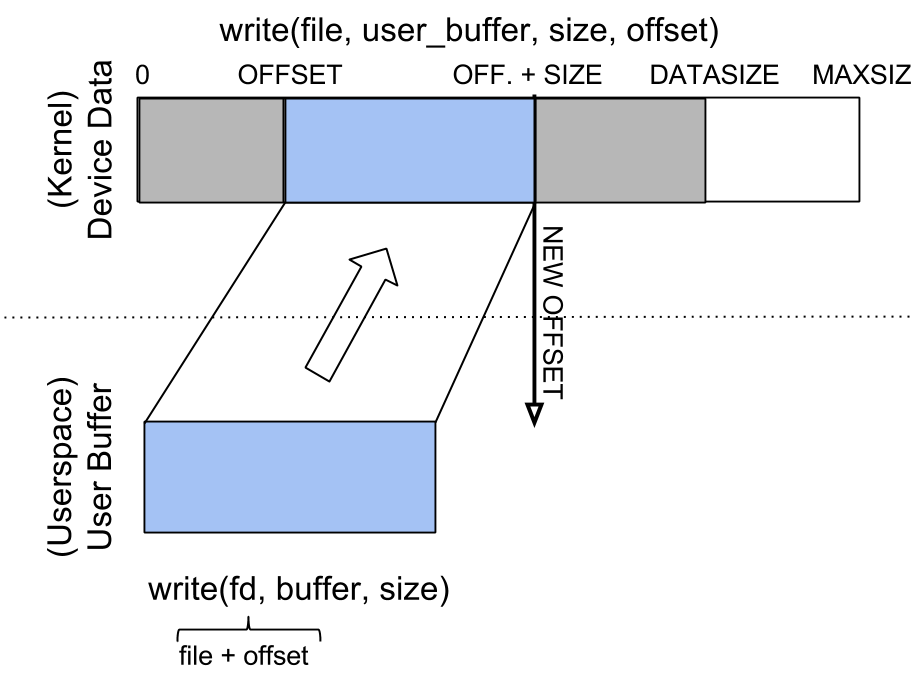
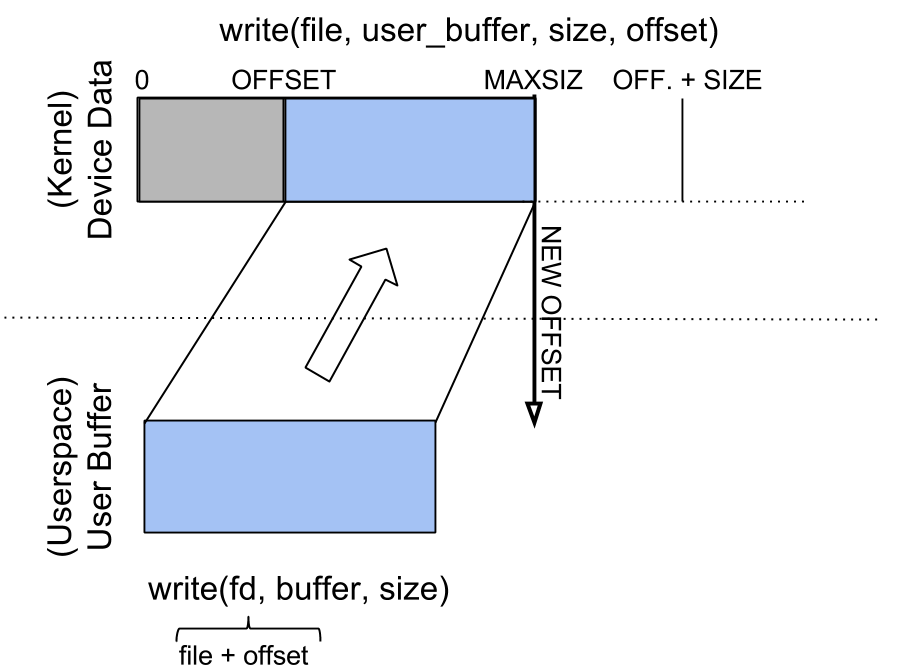
The write operation will respond to a write request from user-space. In this case, depending on the maximum driver capacity (MAXSIZ), it can write more or less than the required size.
ioctl
In addition to read and write operations, a driver needs the ability to perform
certain physical device control tasks. These operations are accomplished by
implementing a ioctl function. Initially, the ioctl system call used Big Kernel
Lock. That's why the call was gradually replaced with its unlocked version
called unlocked_ioctl. You can read more on LWN:
http://lwn.net/Articles/119652/
static long my_ioctl (struct file *file, unsigned int cmd, unsigned long arg);
cmd is the command sent from user-space. If a value is being sent from the
user-space call, it can be accessed directly. If a buffer is fetched, the arg
value will be a pointer to it, and must be accessed through the copy_to_user
or copy_from_user.
Before implementing the ioctl function, the numbers corresponding to the
commands must be chosen. One method is to choose consecutive numbers starting
at 0, but it is recommended to use _IOC(dir, type, nr, size) macro definition
to generate ioctl codes. The macro definition parameters are as follows:
dirrepresents the data transfer (_IOC_NONE,_IOC_READ,_IOC_WRITE).typerepresents the magic number (Documentation/ioctl/ioctl-number.txt);nris the ioctl code for the device;sizeis the size of the transferred data.
The following example shows an implementation for a ioctl function:
#include <asm/ioctl.h>

#define MY_IOCTL_IN _IOC(_IOC_WRITE, 'k', 1, sizeof(my_ioctl_data))

static long my_ioctl (struct file *file, unsigned int cmd, unsigned long arg)
{
    struct my_device_data *my_data =
         (struct my_device_data*) file->private_data;
    my_ioctl_data mid;

    switch(cmd) {
    case MY_IOCTL_IN:
        if( copy_from_user(&mid, (my_ioctl_data *) arg,
                           sizeof(my_ioctl_data)) )
            return -EFAULT;

        /* process data and execute command */

        break;
    default:
        return -ENOTTY;
    }

    return 0;
}
At the user-space call for the ioctl function, the my_ioctl function of the driver will be called. An example of such a user-space call:
if (ioctl(fd, MY_IOCTL_IN, buffer) < 0) {
    /* handle error */
}
Waiting queues
It is often necessary for a thread to wait for an operation to finish, but it is desirable that this wait is not busy-waiting. Using waiting queues we can block a thread until an event occurs. When the condition is satisfied, elsewhere in the kernel, in another process, in an interrupt or deferrable work, we will wake up the process.
A waiting queue is a list of processes that are waiting for a specific
event. A queue is defined with the wait_queue_head_t type and can
be used by the functions/macros:
#include <linux/wait.h>

DECLARE_WAIT_QUEUE_HEAD(wq_name);

void init_waitqueue_head(wait_queue_head_t *q);

int wait_event(wait_queue_head_t q, int condition);

int wait_event_interruptible(wait_queue_head_t q, int condition);

int wait_event_timeout(wait_queue_head_t q, int condition, int timeout);

int wait_event_interruptible_timeout(wait_queue_head_t q, int condition, int timeout);

void wake_up(wait_queue_head_t *q);

void wake_up_interruptible(wait_queue_head_t *q);
The roles of the macros / functions above are:
init_waitqueue_head()initializes the queue; to initialize the queue at compile time, you can use theDECLARE_WAIT_QUEUE_HEADmacro;wait_event()andwait_event_interruptible()adds the current thread to the queue while the condition is false, sets it to TASK_UNINTERRUPTIBLE or TASK_INTERRUPTIBLE and calls the scheduler to schedule a new thread; Waiting will be interrupted when another thread will call the wake_up function;wait_event_timeout()andwait_event_interruptible_timeout()have the same effect as the above functions, only waiting can be interrupted at the end of the timeout received as a parameter;wake_up()puts all threads off from state TASK_INTERRUPTIBLE and TASK_UNINTERRUPTIBLE in TASK_RUNNING status; Remove these threads from the queue;wake_up_interruptible()same action, but only threads with TASK_INTERRUPTIBLE status are woken up.
A simple example is that of a thread waiting to change the value of a flag. The initializations are done by the sequence:
#include <linux/sched.h>

wait_queue_head_t wq;
int flag = 0;

init_waitqueue_head(&wq);
A thread will wait for the flag to be changed to a value other than zero:
wait_event_interruptible(wq, flag != 0);
While another thread will change the flag value and wake up the waiting threads:
flag = 1 ;
wake_up_interruptible (&wq);
Exercises
Important
We strongly encourage you to use the setup from this repository.
- To solve exercises, you need to perform these steps:
- prepare skeletons from templates
- build modules
- start the VM and test the module in the VM.
The current lab name is device_drivers. See the exercises for the task name.
The skeleton code is generated from full source examples located in
tools/labs/templates. To solve the tasks, start by generating
the skeleton code for a complete lab:
tools/labs $ make clean
tools/labs $ LABS=<lab name> make skels
You can also generate the skeleton for a single task, using
tools/labs $ LABS=<lab name>/<task name> make skels
Once the skeleton drivers are generated, build the source:
tools/labs $ make build
Then, start the VM:
tools/labs $ make console
The modules are placed in /home/root/skels/device_drivers/<task_name>.
You DO NOT need to STOP the VM when rebuilding modules! The local skels directory is shared with the VM.
Review the Exercises section for more detailed information.
Warning
Before starting the exercises or generating the skeletons, please run git pull inside the Linux repo, to make sure you have the latest version of the exercises.
If you have local changes, the pull command will fail. Check for local changes using git status.
If you want to keep them, run git stash before pull and git stash pop after.
To discard the changes, run git reset --hard master.
If you already generated the skeleton before git pull you will need to generate it again.
0. Intro
Using LXR find the definitions of the following symbols in the Linux kernel:
struct filestruct file_operationsgeneric_ro_fopsvfs_read()
1. Register/unregister
The driver will control a single device with the MY_MAJOR major and
MY_MINOR minor (the macros defined in the kernel/so2_cdev.c file).
Create /dev/so2_cdev character device node using mknod.
Hint
Read Majors and minors section in the lab.
Implement the registration and deregistration of the device with the name
so2_cdev, respectively in the init and exit module functions. Implement TODO 1.Hint
Read the section Registration and unregistration of character devices
Display, using
pr_info, a message after the registration and unregistration operations to confirm that they were successful. Then load the module into the kernel:$ insmod so2_cdev.koAnd see character devices in
/proc/devices:$ cat /proc/devices | lessIdentify the device type registered with major 42 . Note that
/proc/devicescontains only the device types (major) but not the actual devices (i.e. minors).Note
Entries in /dev are not created by loading the module. These can be created in two ways:
- manually, using the
mknodcommand as we did above.- automatically using udev daemon
Unload the kernel module
rmmod so2_cdev
2. Register an already registered major
Modify MY_MAJOR so that it points to an already used major number.
Hint
See /proc/devices to get an already assigned major.
See errno-base.h and figure out what does the error code mean. Return to the initial configuration of the module.
3. Open and close
Run cat /dev/so2_cdev to read data from our char device.
Reading does not work because the driver does not have the open function implemented.
Follow comments marked with TODO 2 and implement them.
- Initialize your device
- add a cdev struct field to
so2_device_datastructure.- Read the section Registration and unregistration of character devices in the lab.
- Implement the open and release functions in the driver.
- Display a message in the open and release functions.
- Read again
/dev/so2_cdevfile. Follow the messages displayed by the kernel. We still get an error becausereadfunction is not yet implemented.
Note
The prototype of a device driver's operations is in the file_operations
structure. Read Open and release section.
4. Access restriction
Restrict access to the device with atomic variables, so that a single process
can open the device at a time. The rest will receive the "device busy" error
(-EBUSY). Restricting access will be done in the open function displayed by
the driver. Follow comments marked with TODO 3 and implement them.
- Add an
atomic_tvariable to the device structure.- Initialize the variable at module initialization.
- Use the variable in the open function to restrict access to the device. We recommend using
atomic_cmpxchg().- Reset the variable in the release function to retrieve access to the device.
- To test your deployment, you'll need to simulate a long-term use of your device. To simulate a sleep, call the scheduler at the end of the device opening:
set_current_state(TASK_INTERRUPTIBLE);
schedule_timeout(1000);
Note
The advantage of the atomic_cmpxchg function is that it can check the old value of the variable and set it up to a new value, all in one atomic operation. Read more details about atomic_cmpxchg An example of use is here.
5. Read operation
Implement the read function in the driver. Follow comments marked with TODO 4 and implement them.
- Keep a buffer in
so2_device_datastructure initialized with the value ofMESSAGEmacro. Initializing this buffer will be done in moduleinitfunction.- At a read call, copy the contents of the kernel space buffer into the user space buffer.
- Use the
copy_to_user()function to copy information from kernel space to user space.- Ignore the size and offset parameters at this time. You can assume that the buffer in user space is large enough. You do not need to check the validity of the size argument of the read function.
- The value returned by the read call is the number of bytes transmitted from the kernel space buffer to the user space buffer.
- After implementation, test using
cat /dev/so2_cdev.
Note
The command cat /dev/so2_cdev does not end (use Ctrl+C).
Read the read and write sections and Access to the address space of the process
If you want to display the offset value use a construction of the form:
pr_info("Offset: %lld \n", *offset); The data type loff_t (used by offset ) is a typedef for long long int.
The cat command reads to the end of the file, and the end of the file is
signaled by returning the value 0 in the read. Thus, for a correct implementation,
you will need to update and use the offset received as a parameter in the read
function and return the value 0 when the user has reached the end of the buffer.
Modify the driver so that the cat commands ends:
- Use the size parameter.
- For every read, update the offset parameter accordingly.
- Ensure that the read function returns the number of bytes that were copied into the user buffer.
Note
By dereferencing the offset parameter it is possible to read and move the current position in the file. Its value needs to be updated every time a read is done successfully.
6. Write operation
Add the ability to write a message into kernel buffer to replace the predefined message. Implement
the write function in the driver. Follow comments marked with TODO 5
Ignore the offset parameter at this time. You can assume that the driver buffer is large enough. You do not need to check the validity of the write function size argument.
Note
The prototype of a device driver's operations is in the file_operations structure. Test using commands:
echo "arpeggio"> /dev/so2_cdev
cat /dev/so2_cdev
Read the read and write sections and Access to the address space of the process
7. ioctl operation
For this exercise, we want to add the ioctl MY_IOCTL_PRINT to display the
message from the IOCTL_MESSAGE macro in the driver.
Follow the comments marked with TODO 6
For this:
- Implement the ioctl function in the driver.
- We need to use
user/so2_cdev_test.cto call the ioctl function with the appropriate parameters.- To test, we will use an user-space program (
user/so2_cdev_test.c) which will call theioctlfunction with the required arguments.
Note
The macro MY_IOCTL_PRINT is defined in the file include/so2_cdev.h,
which is shared between the kernel module and the user-space program.
Read the ioctl section in the lab.
Note
The user-space code is compiled automatically at make build and
copied at make copy.
Because we need to compile the program for qemu machine which is 32 bit,
if your host is 64 bit then you need to install gcc-multilib package.
Extra Exercises
Ioctl with messaging
Add two ioctl operations to modify the message associated with the driver. Use fixed-length buffer ( BUFFER_SIZE ).
- Add the
ioctlfunction from the driver the following operations:
MY_IOCTL_SET_BUFFERfor writing a message to the device;MY_IOCTL_GET_BUFFERto read a message from your device.- For testing, pass the required command line arguments to the user-space program.
Note
Read the ioctl and Access to the address space of the process sections of the lab.
Ioctl with waiting queues
Add two ioctl operations to the device driver for queuing.
- Add the
ioctlfunction from the driver the following operations:
MY_IOCTL_DOWNto add the process to a queue;MY_IOCTL_UPto remove the process from a queue.- Fill the device structure with a
wait_queue_head_tfield and a flag.- Do not forget to initialize the wait queue and flag.
- Remove exclusive access condition from previous exercise
- For testing, pass the required command line arguments to the user-space program.
When the process is added to the queue, it will remain blocked in execution; To run the queue command open a new console in the virtual machine with Alt+F2 ; You can return to the previous console with Alt+F1. If you're connected via SSH to the virtual machine, open a new console.
Note
Read the ioctl and Waiting queues sections in the lab.
O_NONBLOCK implementation
Note
If a file is open with the O_NONBLOCK flag, then its
operations will be non-blocking.
In case data is not available when performing a read, the following happens:
- if the file has been open with
O_NONBLOCK, the read call will return-EWOULDBLOCK.- otherwise, the current task (process) will be placed in a waiting queue and will be unblocked as soon as data becomes available (in our case, at write).
- To allow unblocking the read operation, remove the exclusive access condition from previous exercises.
- You can use the queue defined for the previous exercise.
- You can ignore the file offset.
- Modify the initial size of data to
0, to allow testing. - For testing, pass the required command line arguments to the
user-space program.
- when using the
noption, the test program will change the open flags toO_NONBLOCKand then perform aread.
- when using the
- What are the flags used to open the file when running
cat /dev/so2_dev?